Map
Description
The Map widget places address markers on a map to show the geographic locations of multiple HMIs, and can integrate with the alarm system to reflect each HMI's health status in real time through color changes on the marker and popup tag. It is suited to scenarios where multiple HMIs' locations and operating status need to be tracked on a map, such as monitoring geographically distributed sites or tracking vehicle-mounted equipment.
Feature Details
Alarm Status Display
The Map widget integrates with the alarm system and reflects the real-time health status of HMIs through color changes. If an alarm is triggered in the alarm class assigned to an HMI, the map visuals change according to the following rules:
- Display Locations:
- Map Marker: The original status indicator (e.g., online/offline) changes to the corresponding alarm color.
- Map Popup Tag: When a marker is clicked, the Tags inside the popup window also change color based on whether an alarm is present.
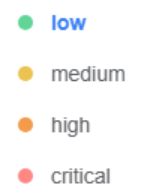
- Color Priority: When multiple alarms of different severity levels occur simultaneously, the system prioritizes the color of the highest-severity alarm. The severity levels are listed below, from low to high:
- Low
- Medium
- High
- Critical
Setting HMI Location
To ensure the map functions correctly, the HMI's latitude and longitude must be configured first. Two configuration methods are available: Static Setting and Dynamic Synchronization.
Static Setting steps:
- Go to the Directory page.
- Select the target HMI.
- Manually enter the location information in the Info/Dashboard panel on the right.
Dynamic Synchronization steps (Auto Update from HMI): If the HMI location changes (e.g., vehicle-mounted equipment), automatic synchronization can be enabled:
- Go to Directory > Dashboard.
- Enable the [Sync from HMI automatically] option.
- Add the following two tag names in [Data Source]:
coordinate/latitudecoordinate/longitude
- After completing the configuration, perform a re-sync in EasyBuilder Pro.
Note: The tag names in the Data Source are case-sensitive. Ensure they match the spelling exactly (
coordinate/latitudeandcoordinate/longitude); otherwise, the data cannot be read.
Style Settings
Data Source
Select the data source for displaying values. A data source must be set before the Dashboard can be published.
Normal Settings
This is a Map-specific setting used to configure the map's display style, zoom level, and the center coordinates of the map view.
Basic
Background Color
Set the background color of the widget. Clicking the color picker opens a color panel with preset color options, custom colors, and opacity adjustment.
Title
- Enable: Check the box to display the title
- Title Text: Enter the title content (up to 100 characters)
- Font: Choose the title font from the dropdown, including default, system fonts (Arial, Calibri, Helvetica, Times New Roman, etc.), and Chinese fonts (Microsoft JhengHei, Microsoft YaHei, SimSun, etc.)
- Case: Default / Uppercase / Lowercase / Capitalize
- Size: Title font size, ranging from 10-128
- Font Color: Set the title text color (default #333333)
- Alignment: Left / Center / Right
When the title is not enabled, the settings above are disabled.
Divider
- Enable: Check to display the divider between the title and content (enabled by default)
- Color: Default semi-transparent gray rgba(171, 171, 171, 0.36)
- Thickness: Ranging from 1-10
Available only when the title is enabled.
Profile
Compact Mode
When enabled, the widget is displayed with smaller margins and a more compact layout to save screen space.
Position and Size
- X / Y: The widget's coordinates on the canvas. The minimum is defined by the system; the maximum is calculated dynamically based on the canvas size and the widget's width and height.
- Width / Height: The widget has a system-defined minimum usable size and a default value; the actual value is calculated dynamically by the system based on the canvas and the widget's content.
User Restriction
Object Class
Select the security access class for the widget. Only users with the corresponding permission can view or operate it: None (default, unrestricted) / Class A to L.
Hide when protected
When checked, the widget is completely hidden (rather than merely disabled) for users without access permission. Available only after an object class is set.
Disabled
When checked, all interactive functions of the widget are disabled. Available only after an object class is set.
Limitations and Notes
- A data source must be set before the Dashboard can be published; otherwise, publishing will fail.
- Up to 5 address markers can be displayed on the map.
- Up to 10 Map widgets can be added per screen.
- The tag names
coordinate/latitude/coordinate/longitudeused for dynamic synchronization are case-sensitive and must match the exact spelling; otherwise, the data cannot be read.