Social Login
Social login lets users sign in to Weincloud with an existing third-party account (Google, Microsoft, Apple, WeChat) or an email verification code, without maintaining another password. Beyond signing in, a social identity provides two capabilities available only to social login users: managing and switching between multiple Weincloud accounts from one identity, and configuring webhooks and HMI subscriptions to push HMI alarm events to external systems.
This chapter covers creating a social identity, linking and unlinking Weincloud accounts, switching between accounts, configuring external notifications, and managing sessions and social login information. To manage the social link state of a single account (linking or unlinking on the [Profile] page), see Profile — Social Login.
Overview
Social login addresses three problems:
- Password-free sign-in: identity is verified by a third-party provider, reducing password management overhead and exposure risk.
- Centralized multi-account management: one person often holds several Weincloud accounts (for example, operations accounts in different Domains). Once they are linked to the same social identity, you can switch between them after signing in instead of repeatedly signing out and back in.
- External alarm delivery: create webhooks under your social identity and subscribe HMIs to forward HMI event notifications to your own system or messaging service.
Supported Providers
The available providers are determined by the server region:
| Server | Available providers |
|---|---|
| Global server | Email, Google, Microsoft, Apple |
| China server | Email, WeChat |
With Email, verification is completed by a one-time code sent to your inbox; no third-party platform account is required.
How Social Identities Map to Weincloud Accounts
This mapping is the premise for every operation in this chapter:
- One social identity can be linked to multiple Weincloud accounts. The [Linked Users] page lists exactly that set.
- One Weincloud account can have only one social identity at a time. To switch providers, unlink first and then link again.
- At sign-in, the social identity is verified first; you then choose which of the linked Weincloud accounts to enter.
Consequently, unlinking and deleting a social login differ in scope: the former affects a single Weincloud account, the latter affects every account under that social identity. See FAQ.
Use Cases and Intended Users
| Use case | Intended users | Section |
|---|---|---|
| First time using Weincloud, wants to start with a social account | New users | First Sign-in and Account Creation |
| Already has a Weincloud account, wants to sign in socially | Existing users | Linking More Weincloud Accounts |
| Operates several Domains and switches accounts frequently | System integrators, multi-site operators | Switching Weincloud Accounts |
| Wants HMI alarms delivered to an in-house system, LINE, or Telegram | System integrators, IT staff | External Notification |
| Wants to review sign-in records or force other devices out | All social login users | Session Management |
The features under [Social Settings] are available to social login users only. When you sign in with an account and password, these menu items do not appear; opening the URL directly shows "This page is only available for social login accounts."
A social login user's permissions are exactly those of the Weincloud account currently signed in. The social identity itself carries no additional permissions.
Where to Find These Features
Social login features are grouped under [Social Settings] in the left menu:
| Menu item | Purpose |
|---|---|
| [Linked Users] | Review the linked Weincloud accounts, and link or unlink them |
| [Notifications] | Manage webhooks and HMI subscriptions for external notification |
| [Settings] | Review social profile, manage sessions, and delete the social login |
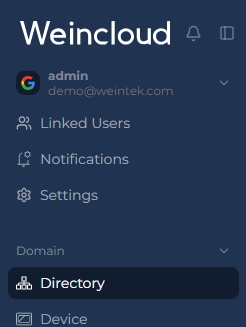
Account switching and the [Profile] entry are located in the user block at the bottom of the left menu.
First Sign-in and Account Creation
After you select a provider on the login page and complete authorization, the system offers the following options depending on the current link state of that social identity:
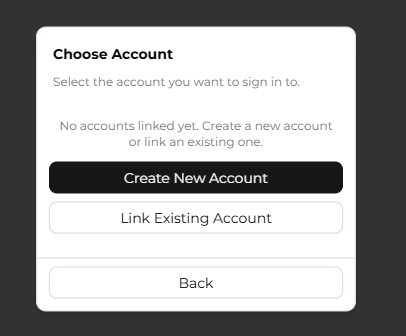
- Create a new Weincloud account: Weincloud generates a Domain name for you. This name can be changed once afterwards — see Changing the Domain Name.
- Link an existing Weincloud account: enter the Domain, username, and password of the existing account. Once linked, you can sign in to it with the social account.
- Select a linked account: if the social identity already has linked Weincloud accounts, pick the one to enter from the list.
Do not refresh the page or use the browser's back button during authorization; doing so requires restarting from the login page. For related error messages and remedies, see Troubleshooting — Social Login Problems.
Linking More Weincloud Accounts
Link other Weincloud accounts to your current social identity so that you can sign in to and switch between them with the same social account.
Prerequisites: you need the Domain, username, and password of the target account, and that account must not already be linked to another social identity.
Steps
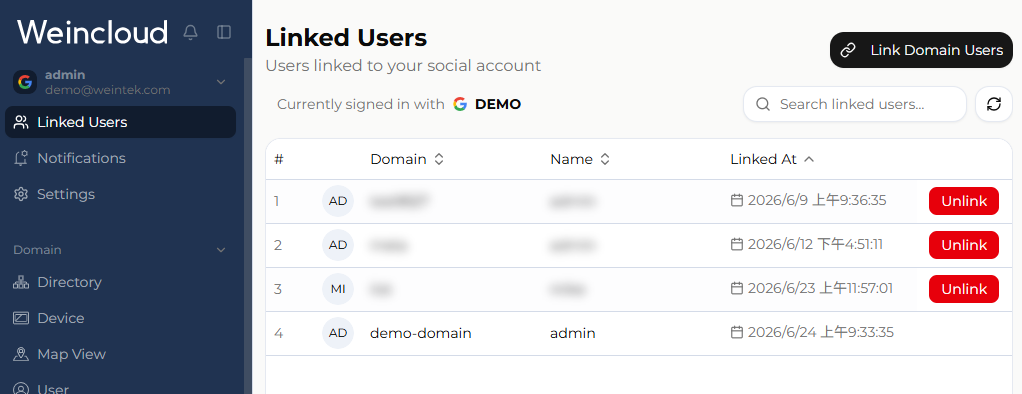
- Select [Linked Users] from the left menu.
- Click [Link Domain Users] in the upper right corner.
- Enter [Domain], [Name], and [Password], then submit.
Result
- If verification succeeds and no further confirmation is required, the account appears in the list immediately.
- If email confirmation is required, the page shows "Verification Email Sent". Open the confirmation link sent to that account's registered email address; the confirmation page showing "Email Confirmed" means the link is complete. The confirmation link expires after a limited time; "Link Expired" means you must repeat the linking procedure.
- If the target account has Multi-Factor Authentication (MFA) enabled, the system sends an additional confirmation email requiring a second confirmation.
Each row in the list shows the account's [Domain], [Name], and [Linked At], and the list supports search, sorting, and pagination.
Switching Weincloud Accounts
Prerequisites: the current social identity is linked to two or more Weincloud accounts. With only one linked account, the switch entry is not displayed.
Steps
- Click the user block at the bottom of the left menu.
- Click the switch-account icon to the right of the user information.
- Select the Weincloud account to enter and confirm.
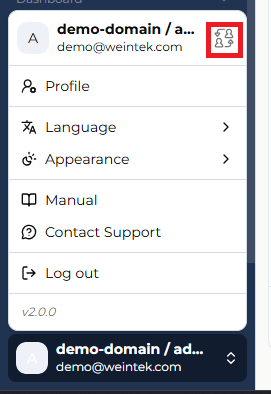
After switching, you stay on the same page, which reloads with the new account's permissions.
This dialog lists linked accounts only; it provides no entry for creating a new account or linking a new one. To add a link, use Linking More Weincloud Accounts instead.
Unlinking
Unlinking removes the association between a single Weincloud account and the social identity. The social identity itself, and its links to other accounts, are unaffected.
There are two entry points with identical results:
From the [Linked Users] page
- Select [Linked Users] from the left menu.
- Click [Unlink] on the row of the account to unlink. The row for the account you are currently signed in with does not offer this button.
- The dialog requires you to sign in again with the same social provider to verify your identity. If the verified account does not match the linked account, an error appears and you must verify again.
- After verification succeeds, review the warning and click [Delete] to finish.
From the [Profile] page
Click the user block at the bottom of the left menu, select [Profile], and click [Unlink] in the [Social Login] section. For detailed steps, see Profile — Unlinking a Social Account.
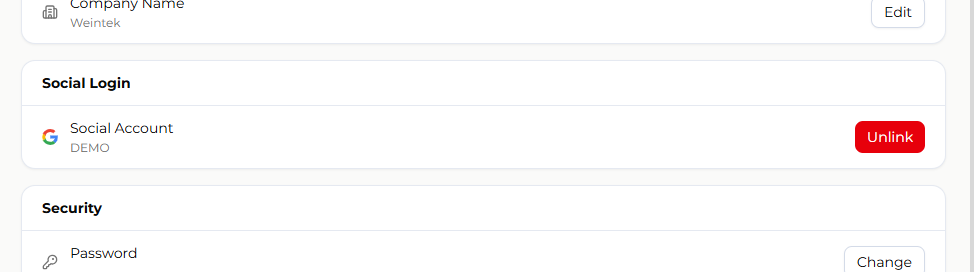
Unlinking cannot be undone. Afterwards the Weincloud account reverts to signing in with its account and password, and it can be linked again to the same or a different social identity.
Changing the Domain Name
This applies to users who created a Weincloud account through social login for the first time. The Domain name of such an account is generated by the system and can be changed once.
Select [Domain] from the left menu and open [Settings].
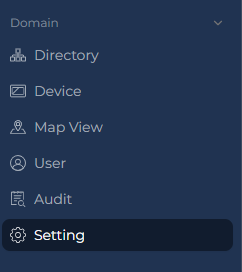
Locate the [Name] item and click [Edit] on the right.

Enter the new name and submit to apply it.
External Notification
External notification lets social login users push HMI event alarms to a custom HTTP endpoint, for integration with in-house systems, a LINE official account, a Telegram bot, or an enterprise notification platform.
The feature lives on the [Notifications] page and has two tabs: [Webhooks] defines where notifications go, and [HMIs] defines whose events are sent. The two must be bound to each other before any notification is delivered.
For the webhook request format, event type codes, and AWS Lambda / Cloudflare Workers integration samples, see Receiving Push Notifications via Webhook.
Webhooks
Creating a webhook
- On the [Notifications] page, switch to the [Webhooks] tab and click [Create Webhook].
- Fill in the fields and click [Create].
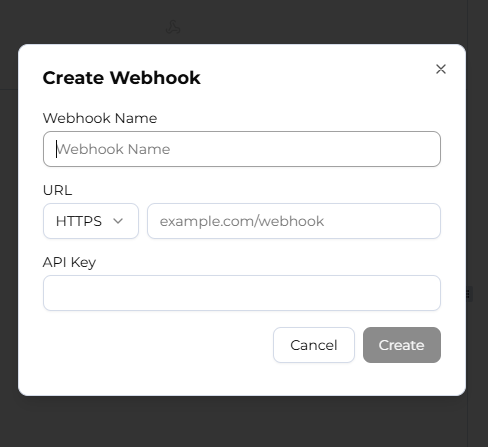
| Field / function | Description |
|---|---|
| [Webhook Name] | An identifying name. Required. |
| [URL] | The endpoint that receives notifications. Select HTTPS or HTTP from the dropdown and enter the rest of the address; HTTPS is recommended. Required. |
| [API Key] | Optional but recommended. Weincloud includes this key in outgoing requests so the receiving end can verify the source. |
| [Enabled] | Controls whether this webhook pushes. The list shows the current state as On or Off. |
Reviewing and maintaining
Select a webhook in the list; the detail panel on the right provides two tabs:
- [Webhook Settings]: click [Edit] to change the name, Endpoint URL, API key, and enabled switch, then click [Save]. A [Test] button sends a test notification to the endpoint immediately to confirm it is reachable; the result is reported as "Test notification sent successfully" or "Test notification failed". The danger zone at the bottom of the panel provides deletion.
- [Subscribed HMIs]: shows which HMIs' events this webhook pushes. Click [Add HMI] to pick HMIs from the Domain's folder tree, or use [✕] to remove one.
The list supports searching by name or Endpoint URL, sorting by name / Endpoint URL / creation time, and pagination at 10 / 20 / 50 per page.
Subscribing HMIs
The [HMIs] tab lists the HMIs currently subscribed to notifications, with [HMI Name], [HW Key], creation time, and enabled state.
Two ways to add HMIs
- [Add HMI]: select HMIs from the current Domain's folder tree. Already-subscribed HMIs appear checked and cannot be selected. Up to 10 can be selected at a time; exceeding that shows "You can select up to 10 HMIs at a time." This method requires the user to hold EasyAccess 2.0 management permission for the HMI.
- [Scan]: use the device camera to scan an HMI QR code, which also works for HMIs in a different Domain. Scanning requires camera access permission in the browser; an invalid QR code raises an error and scanning continues.
Binding webhooks and removing HMIs
Select an HMI in the list; the detail panel on the right provides two tabs:
- [Push Settings]: shows [HMI Name] and [HW Key], and provides [Remove HMI] to remove this HMI from push notifications. Removal cannot be undone.
- [Webhooks]: shows the webhooks currently bound to this HMI. Click [Select Webhooks] to pick from the webhooks not yet bound, up to 10 per operation; use [✕] to unbind one.
For the definition of the per-HMI notification switch and the event type options (
Event Trigger,Event Recover,Event Online/Offline), see Receiving Push Notifications via Webhook.
Session Management
Use this to review every active sign-in of the current social identity and force sign-out where necessary.
- Select [Settings] under [Social Settings] from the left menu.
- In the [Security] section, click [Manage] on [Session Management].

The dialog lists every active session in a table:
| Column | Description |
|---|---|
| [Last Seen] | When the session was last active. |
| [IP] | Source IP address. Click the pin icon beside it to look up the matching location. |
| [OS] | The operating system of the device running the session. |
| [Client] | The browser or client application in use. |
The session in use is marked [You] and offers no sign-out button; every other session can be signed out individually with its power icon.
Clicking [Logout All] signs out all sessions, including the current one; you are signed out immediately, returned to the login page, and must sign in again. The button is unavailable when only one session exists.
Deleting the Social Login
Deleting the social login permanently removes your social login information from Weincloud, affecting all Weincloud accounts linked to that social identity.
- Select [Settings] under [Social Settings] from the left menu.
- In the [Danger Zone] section, click [Delete] on [Delete Social Login].
- The dialog requires you to sign in again with the same social provider to verify your identity.
- After verification succeeds, read the warning and confirm the deletion.

Once deletion completes you are signed out immediately and returned to the login page. This action cannot be undone. Each Weincloud account can still be signed in to with its original account and password, and a social account can be linked again.
Limitations and Notes
- One Weincloud account can have only one social identity at a time; to switch providers, unlink first.
- The Domain name can be changed only by users who created the account through social login for the first time, and only once.
- Unlinking and deleting a social login both require re-verification with the same social provider originally used, and neither can be undone.
- [Add HMI] accepts up to 10 HMIs per operation, and each HMI accepts up to 10 webhooks per operation.
- QR code scanning requires camera access permission in the browser; without it, "Camera not available" is displayed.
- [Logout All] signs out the current session along with the rest.
- A social login user's permissions come entirely from the Weincloud account signed in; permissions cannot be set on the social identity itself.
FAQ
What is the difference between deleting a social login and unlinking?
| Item | Unlinking | Deleting the social login |
|---|---|---|
| Scope | A single Weincloud account | Every Weincloud account linked to that social identity |
| Social login information | Retained, still usable for other linked accounts | Deleted entirely |
| After the operation | The account reverts to account-and-password sign-in | You are signed out immediately and returned to the login page |
Neither makes a difference to subsequent use of Weincloud: the affected accounts can still sign in with an account and password, and can be linked again with Email or another social provider.
Why can't I change my Domain name?
Only users who created a Weincloud account through social login for the first time can change the generated Domain name, and only once. If you have already changed it and still need a different name, contact Weincloud customer service for assistance.
How are a social login user's permissions determined?
Permissions come entirely from the Weincloud account currently signed in. Adjusting that account's permissions changes what the social identity can do when signed in to it; the social identity holds no independent permission settings.
Why don't I see the [Social Settings] menu?
The [Social Settings] group is shown to social login users only. If you signed in with an account and password, link a social account on the [Profile] page first and then sign in with that social account — see Profile — Linking a Social Account.